Virtual Private Networks (VPNs) are essential tools for enhancing your online privacy and security. V2Ray is a popular choice, known for its versatility and strong encryption. In this tutorial, we'll guide you through the process of connecting to a Secologist V2Ray VPN on your Windows device.
Prerequisites for V2Ray VPN on Windows
Before we begin, ensure you have the following:
V2Ray Server Details: You need the server address, port, user ID, and additional configuration details provided by your V2Ray service provider. You can buy an Anonymous V2Ray Subscription or set up your server following our post on Medium.
A Windows Device: This tutorial is applicable for Phones and Tablets.
Please ensure your system timezone settings are set automatically and correctly.
Please set your system timezone settings automatically and correctly to avoid SSL-related errors.
Subscription Profiles for V2Ray VPN
Once you purchase our subscription, you will receive a link with the list of your available profiles/servers, including the V2Ray subscription URL, which will be used to auto-import all provided servers.

Install and Configuring Windows V2Ray VPN Client Application
v2rayN - V2Ray VPN Client
You can follow the simple steps below to utilize v2rayN, import your V2Ray VPN Profiles, and enjoy surfing the internet with speed, security, and privacy.
Download and install dotnet v6 from Microsoft.
Download and extract v2rayN from GitHub. Please ensure you download "v2rayN-with-core".
Open the app, and it will automatically minimize itself. Double-click on the icon, then select the top right menu to change the language to English.
Right-click on the icon, close the app and re-open the app. It will minimize again, and double-click on the icon again to open the window; this time, it's in English.
Copy one of the connection profiles (or all), e.g., "LoadBalancer🇪🇺-1-SSL" by clicking on the copy icon on the right side of the connection profile.
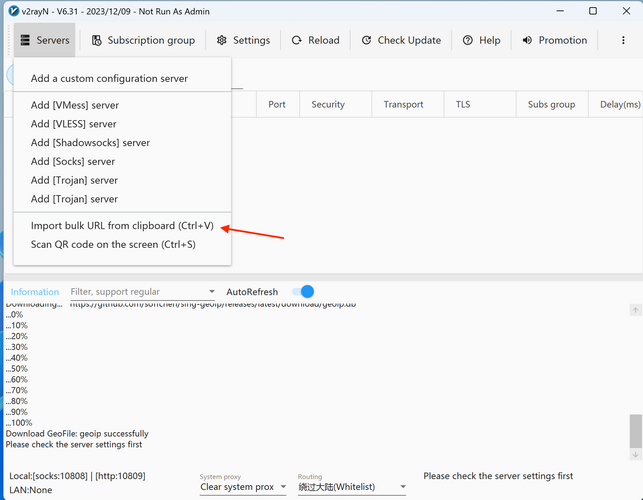
Click on the "Servers" and then click on "Import bult URL from clipboard".
You can keep repeating that, use a subscription URL to import all of the subscriptions (sent by email) or import them by scanning the QR code.
To add a subscription, click on the "subscription group " then "subscription group settings". Now you can add a subscription URL by clicking on "+".
Fill in the information and paste the subscription URL and press "confirm".
Now go back to the home page and click on the three dots menu on the top right corner, then select "update subscription" to sync the profiles with servers and auto-import all subscriptions.
Select a V2Ray VPN profile and then click Connect.
You can see the VPN is connected, and the status is updated.
Ensure you enable the system proxy to tunnel the Windows connections.
To confirm your connection, you can visit iplocation.io and check your IP.